Alerting
🔎Find it: FusionReactor > Alerting
FusionReactor Cloud Alerting allows you to create automated checks on the values of metric data gathered by a FusionReactor agent, and generate alerts when user-made conditions are met.

The alerting system is comprised of Checks and Subscriptions:
- Checks are the conditions that are processed by the alerting engine.
- Subscriptions can be added to a check to notify via other services when an alert is generated.
The alerting area can be found by selecting Alerting in the navigation bar, while alerting service configurations can be found by clicking Configurations.
Note
It is necessary to set-up alerting services before you can start using them to make Subscriptions.
Checks
🔎Find it: FusionReactor > Alerting > Checks
In the Checks screen, you can perform the following actions:
-
View a check.
-
Edit, Duplicate or Delete a check.

Alert status
Hovering over the first icon at the right of the screen displays information about the alert.

-
Ok - This alert has not passed its alert threshold.
-
Firing - This check has passed its alert threshold
-
Pending - The condition of this check has been created or modified and has not yet been checked.
-
Loading - This check has been created and is being loaded by the alerting engine.
-
Updating - The changes to this alert are still being updated into the alerting engine.
-
Unknown - The data for this check could not be found or processed.
Creating a check
🔎Find it: FusionReactor > Alerting > Checks > + Check
To create a check, select + Check on the top right of page.

The Create new check screen is displayed.

Tip
We recommend only creating checks that fire when action to correct a situation is required. If you have too many alerts fire, we tend to find that alerts begin to be ignored. As a result crucial alerts that are important can be missed.
Info
The alerting engine runs every 60 seconds.
There are two ways to set a query:
Builder
Step 1: Name your check
The first step in creating a check is naming it.
Tip
Using a name that describes the situation firing the event is recommended.
Step 2: Set your query
The metrics list contains every metric that has been ingested into your cloud account

Functions can be applied to your metric if required.

Functions include:
- Sum
- Average
- Count
- Min
- Max
- Group
- Standard deviation
- Unless
- Absent
The Grouped by labels dropdown will set which labels the data is grouped by, before a function is run on each group.

Any changes to your metric selection, function or group will be applied to the graph showing the metric state.
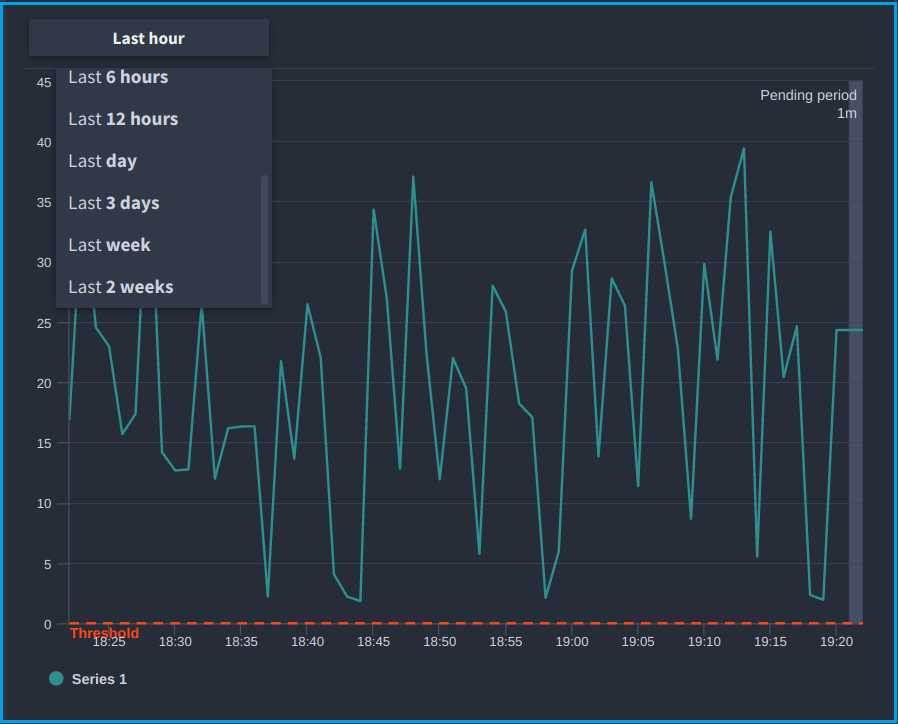
The timeframe of the metric can be adjusted from one hour, up to 2 weeks.
Step 3: Filter with labels
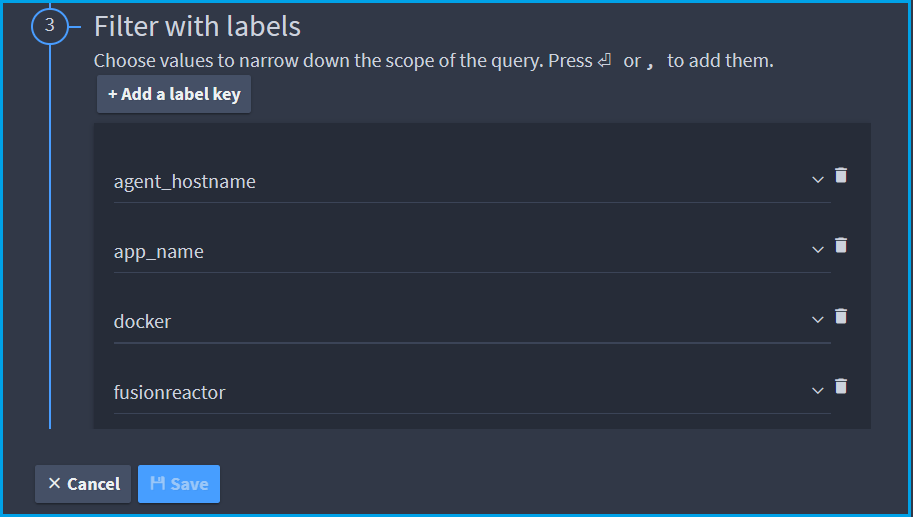
The alerting UI will display each label associated with your selected metric.
-
Select one or more label values to narrow down the data being monitored by the alert.
-
Add your own key/value pairs with Add a label key.
-
Selected labels will alter the metric graph values appropriately.
Step 4: Set your thresholds
Using the metric graph for reference, you can set your alert threshold.
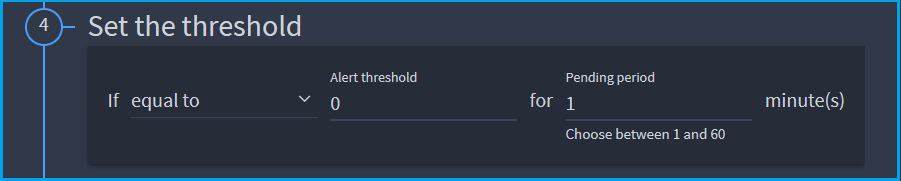
Use the selector to specify whether the value needs to be greater than, less than or equal to the threshold.
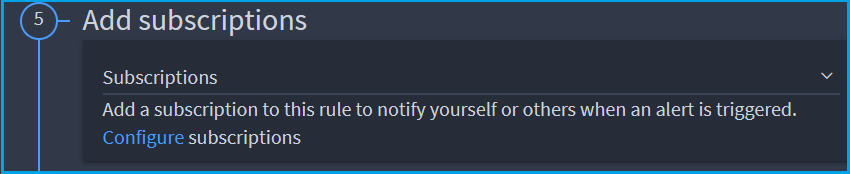
Step 5: Add subscriptions
Specify which of your existing subscriptions you would like your alert to be sent to, or alternatively create a new subscription.
Step 6: Optional configuration
You can set a summary and runbook for your alert notification. These are optional.
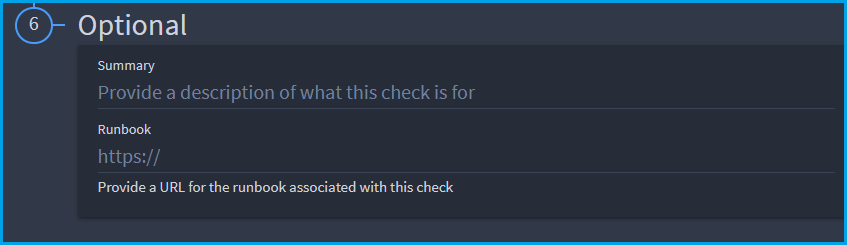
- Summary is a short description of the check, so the receiver knows what the alert is about.
- Runbook is for a URL. This is usually the location of the resources/instructions for What to do when this alert fires.
The summary and runbook, if specified, will appear in your alert.
Code
Step 1: Name your check
The first step in creating a check is naming it.
Tip
Using a name that describes the situation firing the event is recommended.
Step 2: Set your query
To build your query using PromQL, select the code button.

The following screen is displayed:

Example Query

Step 3: Set your thresholds
Using the metric graph for reference, you can set your alert threshold.
Use the selector to specify whether the value needs to be greater than, less than or equal to the threshold.
Step 4: Add subscriptions
Specify which of your existing subscriptions you would like your alert to be sent to, or alternatively create a new subscription.
Step 5: Optional configuration
You can set a summary and runbook for your alert notification. These are optional.
- Summary is a short description of the check, so the receiver knows what the alert is about.
- Runbook is for a URL. This is usually the location of the resources/instructions for What to do when this alert fires.
Example checks
1. When any instance goes offline for 5 minutes
The following example is a check that will monitor the online status of all FusionReactor instances using your Cloud license.
Note
Any instance which has been offline for over five minutes will stop being counted as offline by the check.
To more reliably monitor the online status of a specific job/instance, see the check below.
It's also possible the graph will say no data when you are editing your check. This simply means no instances have gone offline within the time frame shown.
Example

-
This check relies on the function Unless, which returns the value from 5 minutes ago when no data is present now.
-
The Online (up) series is generated by FusionReactor, indicating that it is online. Therefore, if the instance was online 5 minutes ago, but isn't online now, it is offline and data will be returned. The condition is met so an alert will be fired.
2. When a single job goes offline for 5 minutes
This example monitors the online status of an instance, and sends an alert if it goes offline.
If you choose more than one Job or Instance with these alert conditions, then all of the selected jobs/instances must be offline for an alert to fire.
It's possible the graph will say no data when you are editing your check. This simply means the selected instance has not been offline within the time frame shown.
Example

The important parts here are:
-
the function Absent, which returns 1 when no data is present, and the filter labels.
-
The Online (up) series is generated by FusionReactor, indicating that it is online. No data will be present when the instance is offline, so the absent function will return a 1 and cause an alert to be fired.
3. When any instance is using over 90% CPU for 2 minutes
In this example, we make use of the threshold value to have an alert that fires if an instance is using over 90% of the system CPU.
Example

Tip
You can also use less than with the threshold for underflow alerts, to detect unusually low activity. This is useful for services that receive many requests, as low activity could be a sign that requests are not reaching your service.
4. When any instance in a group is using over 90% allocation memory for 10 minutes
Instances can be assigned a group which will appear as a label. In the example shown, testfr is the group set on several instances, and each of those instances will be assessed by the check.
Example

Editing and duplicating checks
Edit - Editing a check will provide you with a form identical to the form for creating one. It will be populated with the existing configuration of the check and when you save it the original check is overwritten.
Duplicate - Duplicate similarly shows the same form with the check's settings already filled in. Selecting Save when duplicating will create a new check instead.
Alerting services
🔎Find it: FusionReactor > User Icon > Configuration
Subscriptions require a service they can send their subscribed alerts to. These are set-up in the configuration menu.

The following alerting services are currently supported:
- Gitlab (via Email)
- HTTP (Webhook)
- Microsoft Teams (via HTTP webhook)
- Slack
Configuring alerting services
Service configurations can be found under Alert services in the Configuration menu. From there you can configure the services you wish to use when creating subscriptions.
To configure a service simply click the Configure next to that service.

A menu like the one shown below will appear:

The required information differs for each service, and are explained in more detail below:
Email
- Simply enable the service.
- Email addresses are set during subscription creation.
Http (Webhook)
- Enter Webhook URL in the subscription during creation.
Slack
Learn more
For the FusionReactor Cloud Slack app:
-
Click the Add to Slack button which will redirect you to the Slack website.
-
If required, sign into Slack, then review the requested permissions and allow the app access to your workspace.
Note
The FusionReactor Cloud app will only have permission to view the name, email domain, and icon for your workspace. It cannot edit anything.
Learn more
Note
If you have to request approval from your Slack workspace admin, you will have to repeat these steps. An admin can approve the request from the app management settings for your workspace or through a direct Slack message they will receive from Slackbot.
After granting the app access, you will be redirected back to FusionReactor Cloud and your service will be configured.
Disabling alerting services
Clicking the toggle next to the service will switch it between being Enabled or Disabled.
When a service configuration is disabled, the following will happen:
- Each subscription that is linked to that service will be disabled. You will need to manually re-enable them after re-configuring the service.
Note
You cannot re-enable the subscriptions until the service is enabled.
- The settings saved on that service will be kept, so no extra set-up is required when re-enabling them.
Resetting alerting services
You can reset the configuration for a service by selecting Reset next to that service.

When a service configuration is reset, the following occurs:
- Each subscription that is linked to that service will be disabled. You you will need to manually re-enable them after re-configuring the service.
Note
You cannot re-enable the subscriptions until the service is enabled.
- The settings saved on that service will be deleted, so any API keys and other information will need to be entered again when re-configuring them.
Subscriptions
The subscriptions tab lets you manage and test your subscriptions.

To view a subscription in more detail, select its name on the left-side of the row.
Creating subscriptions
Clicking the subscription button as shown below, will open the form for creating subscriptions.

The Create new subscription screen is displayed:

Within this form you will be able to set the active times and days of the subscription, as well as which alert states it watches for.
Messages will only be sent to the subscribed service of those conditions that are met by an alert. Each service has different properties that may be configured, and will be explained in more detail below.
Email
- Subject is for the email subject, which is "FusionReactor alert" by default.
- Addresses is where you list the email addresses of recipients for the subscription.
- key and value fields let you enter internet/email message headers as key:value pairs.
Gitlab
Gitlab supports creating issues via email. Follow this guide to find out how.
Flowdock doesn't require any additional configuration beyond the service configuration.
HTTP Webhooks
- Target URL is required, as it is the URL that the alerts will be sent to. Your endpoint should provide this URL that can be simply copied and pasted into the Target URL field.
- Header is for the internet message headers attached to requests.
- Body is for the body of the request.
The end-point of the webhook will vary on what it requires, so be sure to check the documentation of your endpoint to see what schema it follows. Then you can fill in the Body and Header to fit your needs.
Microsoft Teams
To set-up alerting for MS Teams, you will need to set up a Connector.
Learn more
Once you have the URL, enter it into your subscription as the Target URL, as mentioned above for webhooks.
JSON schema used for MS Teams message cards
Example
Copy and paste this into the Body of the webhook, or create your own.
{
    "@type": "MessageCard",
    "@context": "https://schema.org/extensions",
    "summary": "FusionReactor Cloud Alert",
    "themeColor": "479eff",
    "sections": [
        {
            "activityTitle": "FusionReactor Cloud",
            "activitySubtitle" : "My alert title",
            "activityImage": "https://www.fusion-reactor.com/wp-content/uploads/2013/01/frico1.png",
            "text": "This text is here as a placeholder example of the webhook schema for MS Teams."
        }
    ],
    "potentialAction": [
        {
            "@type": "OpenUri",
            "name": "View alerts",
            "targets": [
                {
                    "os": "default",
                    "uri": "https://app.fusionreactor.io/alerting/alerts"
                }
            ]
        }
    ]
}
Resulting output:

Learn more
Slack
For the FusionReactor Cloud Slack app:
- Select Add to Slack which will redirect you to the Slack website.
- If required, sign into Slack, and then select the channel you want alerts to appear in.
- After, you will be redirected back to FusionReactor Cloud where you can continue to configure your subscription.
Editing and duplicating subscriptions
Clicking the Edit button on the row of the subscription you wish to edit will present you with an interface just like the one used to create subscriptions.
The values shown will match what's currently set on the subscription. Once you've made your desired changes, simply click Save and your changes will overwrite on the subscription.
If you don't wish to overwrite the existing subscription you can click Duplicate. The values shown will match what's currently set on the subscription you chose. You can changes before saving it.
Clicking Save at the end of the form, creates a new subscription.
Deleting and disabling subscriptions
Clicking Delete results in a message requesting confirmation that you wish to delete the subscription. Choosing Ok will delete the subscription from your account.
Warning
This cannot be undone.
Clicking the toggle under Enabled will enable or disable the subscription. The check will appear blue when enabled.
While disabled, checks will not send alerts to that subscription and the subscription will not appear when looking at a check in the detailed view.
If the alert service used by the subscription is not configured, or disabled, then the subscription will be automatically disabled and cannot be enabled until the service is configured and enabled.
Need more help?
Contact support in the chat bubble and let us know how we can assist.